
Are you wondering how to create a new WordPress admin user for a fellow team member, vendor, or our Mission Control Team? Look no further, this guide will explain everything you need to know!
WordPress is one of the most popular open source content management systems (CMS), offering a user-friendly interface and extreme flexibility for website creation and management. When working on a WordPress website, it’s essential to have a solid understanding of user roles and permissions so you can navigate effectively. Whether you want to delegate tasks or share the responsibility of managing your WordPress site effectively, adding a new admin user is the way to go. In this easy-to-follow guide, we’ll walk you through the step-by-step process of creating a new admin user in WordPress.
Step 1: Access the WordPress Dashboard
Alright, let’s get started! Log in to your WordPress website using your admin credentials. Once you’re in, you’ll land on the WordPress Dashboard – which is the central control panel for managing your site.
Step 2: Find the user menu on the sidebar
Look at the left-hand sidebar on your Dashboard. Hover over the “Users” option, and a handy submenu will pop up. Click on “Users” to dive into the user management section.
Step 3: Add a New User
Great, now you’re on the Users page. To add a new user, find the “Add New” button – usually located near the top of the page or in the submenu. Give it a click!
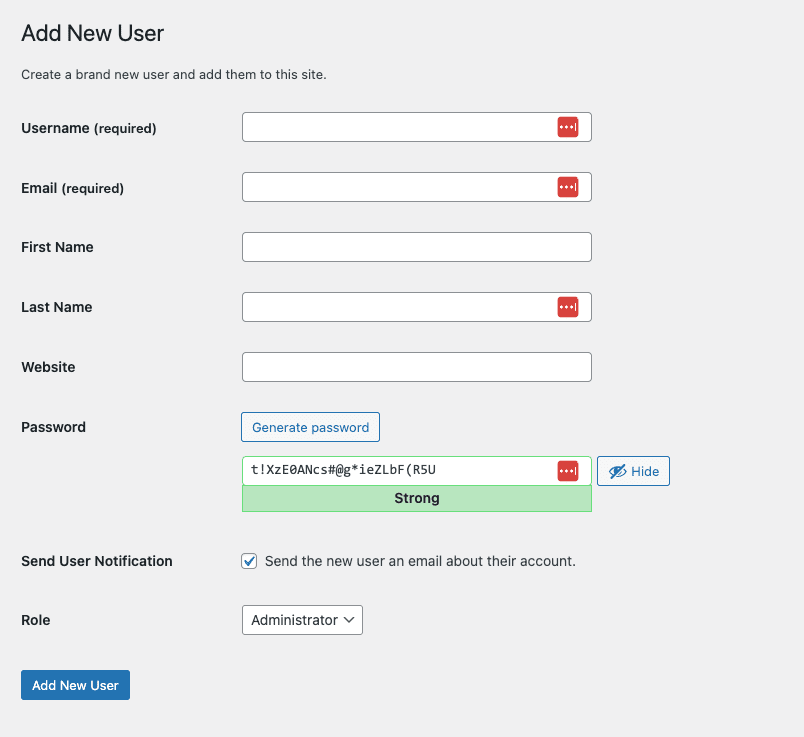
Step 4: Fill in User Details
This is where you’ll provide some essential information about the new admin user. Fill in the following details:
- Username: Pick a unique username for the new admin user.
- Email: Enter a valid email address associated with the user.
- First Name: Share the first name of the user.
- Last Name: Enter the last name of the user.
- Website: If the user has a website, you can add its URL here.
When sharing access to your website with the Hueston Mission Control Team, please use hello@hueston.co for the email field.
Step 5: Set a Strong Password
Scroll down a bit, and you’ll find the “Account Management” section. Click on the “Show Password” button, and WordPress will generate a secure password for you. You can either copy this password or replace it with a strong one of your own.
Step 6: Assign the Administrator Role
Now, in the “Role” dropdown menu, select “Administrator.” This role gives the user full access to the WordPress Dashboard, making them a super admin!
Step 7: Save the User Information
You’re almost done! After filling in the user details and assigning the administrator role, find the “Add New User” button at the bottom of the page and click on it. WordPress will save the user information, and you’ll see a confirmation message.
Step 8: Notify the New Admin User
Once the user has been created successfully, it’s a good idea to notify the new admin user about their shiny new account. If you didn’t already click the checkbox to “send user notification”, be sure to shoot them an email with their username and login instructions, so they’re all set to dive into the WordPress world.
You’re all set! Now what?
Creating a new admin user in WordPress is a breeze, and now you know exactly how to do it! By following these steps, you can empower others to help manage your website efficiently. Remember to keep user roles and permissions in mind to ensure the security and integrity of your WordPress site.
For Hueston partners, please confirm back with the Mission Control Team now that you’ve shared access, so we can dive into our launch sequence, and prepare your site for lift-off!
Happy managing!
